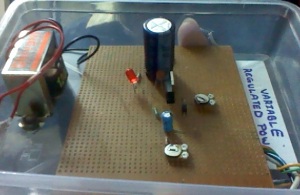
 The project “VARIABLE REGULATED POWER SUPPLY” plays a very important role in the laboratory functions and that is mainly to the electronics labs. As in electronics all the instruments, components work on a particular regulated dc supply ,so a project which can provide this supply by converting the alternating current to direct current that too into a great range of regulated power keep its own preference. As it can produce a range of 0-30 v direct current by regulating and converting alternating current is has a vast application too. Such converters are also known as "Switch Mode Power Supply" (SMPS). AC to DC converters generally comprise a rectifier bridge to rectify the AC current of the input line and a regulating device supplying on output of one or more regulated DC voltages.
Just the simple ac current is applied and through potentiometer you get the desired regulated dc power supply.

Following is the list of parts or the components required to design this circuit:
1. BR1 = Bridge Rectifier, 100V - 3A
2. C1 = 2200 µF, 63V
3. IC1 = LM317, adjustable regulator
4. C2 = 0.1 µF
5. V = Meter, 30V, Ri = 85 ohm
6. C3 = 1µF, 40V
7. TR1 = Transformer, 25V, 2A
8. Plug = 3-wire plug & cord
9. R1 = 18K, 5%
10. S1 = On-Off toggle switch
11. R2 = 220 ohm, 5%
12. D1 = 1N4001
13. R3 = 27K, 5%
14. Fuse = 110V, 500mA, slow-blow
15. P1 = 5K, potentiometer
16. P2 = 10K, 10-turn trim-pot
17. Fuse Holder, wire, solder, case, knob for P1
18. Red & Black Banana Jacks
WORKING:-
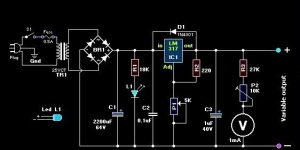
The 110V-AC coming from the powercord is fed to the transformer TR1 via the on-off switch and the 500mA fuse. The 30v ac output (approximately) from the transformer is presented to the BR1, the bridge-rectifier, and here rectified from AC (Alternating Current) to DC (Direct Current). If you don't want to spend the money for a Bridge Rectifier, you can easily use four general purpose 1N4004 diodes. The pulsating DC output is filtered via the 2200µF capacitor (to make it more manageable for the regulator) and fed to 'IN'-put of the adjustable LM317 regulator (IC1). The output of this regulator is your adjustable voltage of 1.2 to 30 volts varied via the 'Adj' pin and the 5K pot meter P1. The large value of C1 makes for a good, low ripple output voltage.
Why exactly 1.2V and not 0-volt? Very basic, the job of the regulator is two-fold; first, it compares the output voltage to an internal reference and controls the output voltage so that it remains constant, and second, it provides a method for adjusting the output voltage to the level you want by using a potentiometer. Internally the regulator uses a zener diode to provide a fixed reference voltage of 1.2 volt across the external resistor R2. (This resistor is usually around 240 ohms, but 220 ohms will work fine
without any problems). Because of this the voltage at the output can never decrease below 1.2 volts, but as the potentiometer (P1) increases in resistance the voltage across it, due to current from the regulator plus current from R2, its voltage increases. This increases the output voltage.
D1 is a general purpose 1N4001 diode, used as a feedback blocker. It steers any current that might be coming from the device under power around the regulator to prevent the regulator from being damaged. Such reverse currents usually occur when devices are powered down.
The 'ON' Led will be lit via the 18K resistor R1. The current through the led will be between 12 - 20mA @ 2V depending on the type and color Led you are using. C2 is a 0.1µF (100nF) decoupler capacitor to filter out the transient noise which can be induced into the supply by stray magnetic fields. Under normal conditions this capacitor is only required if the regulator is far away from the filter cap, but I added it anyway. C3 improves transient response. This means that while the regulator may perform perfectly at DC and at low frequencies, (regulating the voltage regardless of the load current), at higher frequencies it may be less effective. Adding this 1 µF capacitor should improve the response at those frequencies.
R3 and the trimmer pot (P2) allows you to 'zero' your meter to a set voltage. The meter is a 30Volt type with an internal resistance of 85 ohms. I you have or obtained a meter with a different Ri (internal resistance) you will have to adjust R3 to keep the current of meter to 1mA. Just another note in regards this meter, use the reading as a guideline. The reading may or may not be off by about 0.75volts at full scale, meaning if your meter indicates 30 volts it may be in reality almost 31 volts or 29 volts. If you need a more precise voltage, then use your multimeter.
Thanks for this post. I definitely agree with what you are saying. I have been talking about this subject a lot lately with my father so lets hope this will get him to see my point of view. Fingers crossed!
ReplyDeleteCan I just say what a relief to find someone who conveniently knows what they're talking about on the internet. You as a matter of fact know how to bring an issue to light and make it distinctive. More people need to read this and understand this side of the story. I cant believe youre not more popular because you definitely have the gift.
ReplyDeleteCan I simply say what a aid to seek out somebody who actually is aware of what theyre speaking about on the internet. You definitely know learn how to deliver a difficulty to mild and make it important. Extra folks must read this and perceive this facet of the story. I cant consider youre no more in style because you positively have the gift.
ReplyDeleteregardless of the complexity of the subject, you managed to do so well! I can only dream i could write like you do.
ReplyDeleteWell I was just searching on Google for some videos and songs of my favorite singers and just came across your blog, generally I just visit blogs and retrieve my required information but this time the useful information that you posted in this post pushed me to reply here and accept as true your good work. I just bookmarked your blog?.
ReplyDeleteI’m impressed, I need to say. Really not often do I encounter a blog that’s each educative and entertaining, and let me inform you, you might have hit the nail on the head. Your idea is outstanding; the issue is something that not sufficient individuals are speaking intelligently about. I'm very blissful that I stumbled across this in my seek for something regarding this.
ReplyDelete[...] VARIABLE REGULATED POWER SUPPLY–PROJECT [...]
ReplyDeleteReblogged this on Techworld 4 U.
ReplyDeleteI need to know the importance and limit of operation of a variable power supply
ReplyDeletewhat are the aims,applications and limit of operation of a variable power supply
ReplyDeleteapplication - labs and small devices
ReplyDeletelimit of operation - range is already stated
hey.....what is the future aspect of this project???????????
ReplyDeletenothing!!!It is a very coomon and basic project for an E&C students.
ReplyDeletedo you have the ppt form of this project???? plzz reply soon...
ReplyDeleteIf you would like to get a good deal from this post then you have to apply these methods
ReplyDeleteto your won web site.
I want to buy this project. Contact me
ReplyDeletein this ,,,,how is the your project controlling (varrying) voltage .????? controlling dvice is IC LM317 ...then what is creative thing by your project.....??
ReplyDeleteWonderful, what a website it is! This web site gives useful facts to us, keep it up.
ReplyDelete